
Few things bring people together like the irresistible combination of gooey cheese, savory taco-seasoned meat, and crispy golden tortillas. If you love tacos and crave the comfort of melty cheese, Cheesy Taco Sticks might just become your new favorite snack. But what makes these handheld bites so special?
Imagine biting into a crispy, cheese-covered shell that gives way to a warm, flavorful filling of seasoned beef and melted cheddar. Whether you’re hosting a game night, planning a family dinner, or simply looking for an easy-to-make indulgence, these cheesy delights check every box. But the best part? They’re incredibly versatile—you can bake or fry them, switch up the ingredients, and pair them with a variety of dips for the ultimate flavor explosion.
In this guide, we’ll take you through everything you need to know about Cheesy Taco Sticks—from the must-have ingredients to step-by-step cooking instructions, delicious variations, and the best ways to serve them. Ready to take your snack game to the next level? Let’s dive in!
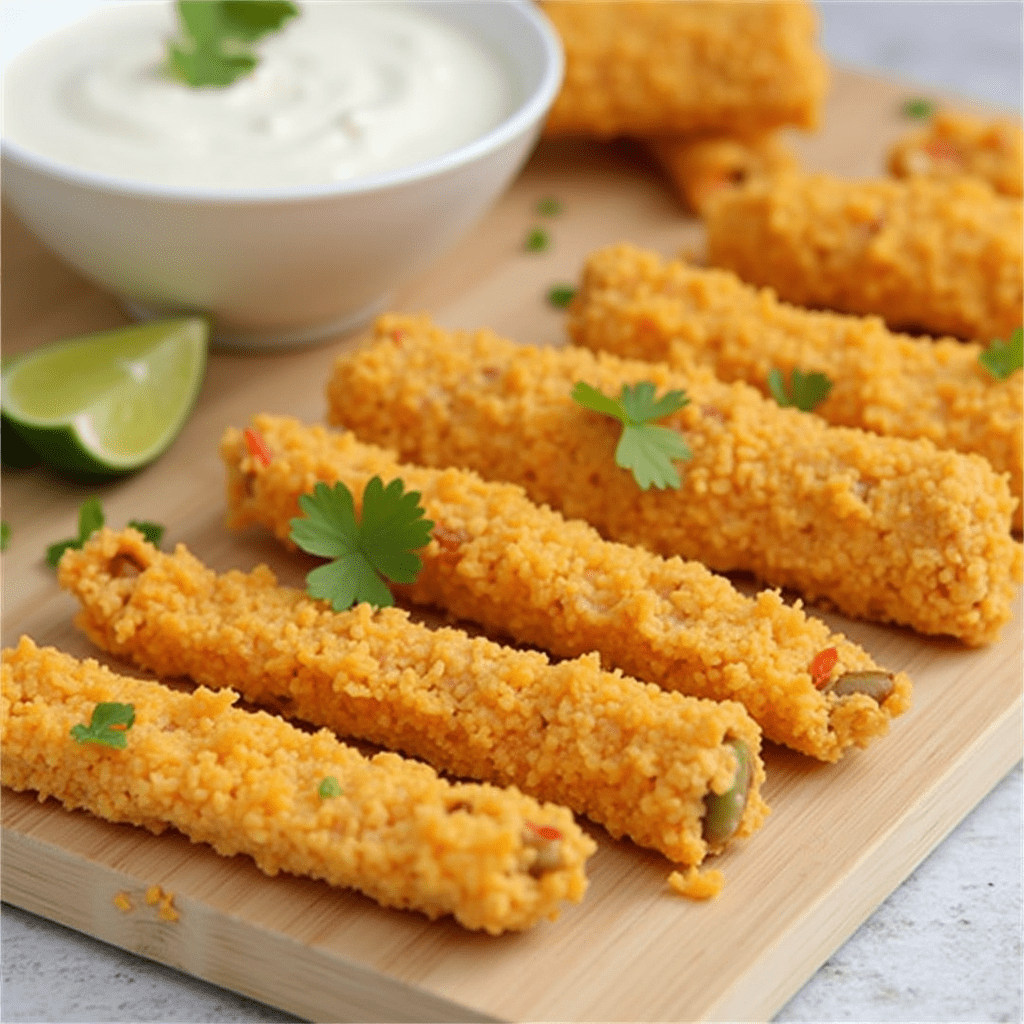
Table of Contents
What Are Cheesy Taco Sticks?
If you’re a fan of tacos and all things cheesy, then Cheesy Taco Sticks are about to become your new go-to snack. They take everything you love about tacos—the bold flavors, the satisfying crunch, the gooey cheese—and wrap it into a convenient, handheld delight. But what exactly are they, and why is everyone raving about them?
A Twist on a Classic Favorite
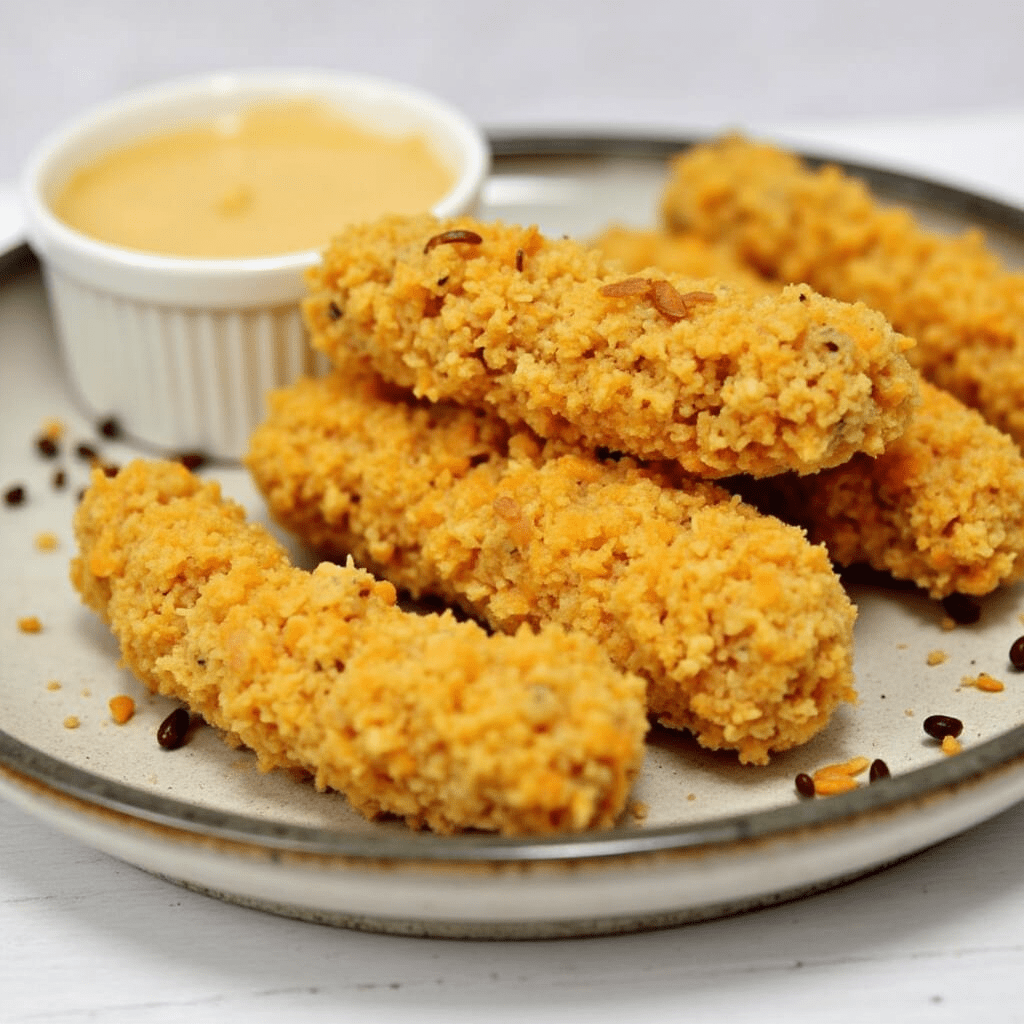
Think of Cheesy Taco Sticks as a fusion between tacos, quesadillas, and mozzarella sticks—but even better. Instead of using a traditional taco shell, these are made by rolling seasoned taco meat and melty cheese inside soft tortillas, then baking or frying them to crispy perfection. The result? A golden-brown, flavor-packed snack that’s perfect for dipping, sharing, and satisfying cravings.
Why They’re a Crowd Favorite
There’s a reason Cheesy Taco Sticks have been making waves in the food scene. Here’s why they stand out:
Perfect for Any Occasion – Whether you’re prepping for a party, making a quick weeknight dinner, or needing an easy game-day snack, these taco sticks fit the bill.
Mess-Free & Portable – Unlike traditional tacos that can fall apart, these are tightly rolled and sealed, making them easy to eat on the go.
Customizable to Your Taste – From switching up the protein to experimenting with different cheeses and spices, you can tailor them to suit your preferences.
How Are They Different from Traditional Tacos?
While tacos are typically open-faced and served in a soft or crunchy shell, Cheesy Taco Sticks take a different approach:
- Shape & Structure – Instead of an open taco, these are neatly rolled into stick-like shapes, making them easier to hold and dip.
- More Cheese, Less Mess – Since the cheese is sealed inside, every bite is perfectly gooey without it dripping all over.
- Versatile Cooking Methods – You can bake them for a lighter crunch or fry them for an extra crispy bite, something you don’t always get with regular tacos.
The Bottom Line
Cheesy Taco Sticks aren’t just another snack—they’re a game-changer in the world of comfort food. Whether you love experimenting in the kitchen or just want a fun twist on taco night, these little bundles of flavor are sure to impress. And the best part? They’re incredibly easy to make.
Now that you know what makes these taco sticks so irresistible, let’s dive into the ingredients you’ll need to make them at home! 🚀:
Ingredients You’ll Need for the Perfect Cheesy Taco Sticks
Before you start whipping up a batch of Cheesy Taco Sticks, let’s talk about the essentials. The right ingredients make all the difference, ensuring you get that perfect balance of crispy, cheesy, and flavorful goodness in every bite.
The Must-Have Ingredients
Here’s everything you’ll need to bring these delicious taco sticks to life:
🌮 Core Ingredients:
- Tortillas – Soft flour tortillas work best since they’re easy to roll and crisp up nicely.
- Ground Beef (or Protein of Choice) – Classic taco seasoning pairs best with beef, but you can also use chicken, turkey, or even plant-based alternatives.
- Shredded Cheese – Cheddar, Monterey Jack, or a Mexican cheese blend are excellent choices for that gooey, melty goodness.
- Taco Seasoning – A mix of chili powder, cumin, paprika, and garlic powder gives your filling that signature taco flavor.
🧀 Optional Add-Ins for Extra Flavor:
- Diced Jalapeños – If you love a spicy kick, mix in some finely chopped jalapeños.
- Cream Cheese or Sour Cream – For a creamier, richer filling, blend in a spoonful of cream cheese.
- Chopped Onions & Garlic – Sautéed onions and garlic add depth to the beef mixture.

Choosing the Right Cheese for Maximum Flavor
Let’s be honest—the cheese is the star of the show in Cheesy Taco Sticks. So, what’s the best option?
- For Classic Meltiness: Use cheddar or Monterey Jack—they melt beautifully and add a sharp, tangy flavor.
- For a Stretchy Pull: Mozzarella gives you that Instagram-worthy cheese pull.
- For a Spicy Twist: Pepper Jack adds a hint of heat without overpowering the dish.
Pro Tips for the Best Results
✅ Preheat Your Tortillas – Slightly warming the tortillas before rolling prevents them from cracking.
✅ Drain Excess Grease – If using ground beef, drain the fat after cooking to avoid a soggy filling.
✅ Shred Cheese Fresh – Pre-shredded cheese contains anti-caking agents, which can affect how smoothly it melts.
Bringing It All Together
Now that you’ve got your ingredients ready, it’s time to assemble and cook! In the next section, we’ll walk through a step-by-step guide to rolling, sealing, and cooking your Cheesy Taco Sticks to crispy, golden perfection. 🚀
Step-by-Step Guide to Making Cheesy Taco Sticks
Now that you have all your ingredients ready, it’s time for the fun part—bringing your Cheesy Taco Sticks to life! Whether you’re making them for a quick snack, a party appetizer, or a family dinner, this easy-to-follow guide will help you get that perfect crispy, cheesy, and flavorful result.
Step 1: Prepare the Taco Filling
The key to flavorful Cheesy Taco Sticks starts with a well-seasoned taco meat mixture.
- Cook the Protein – In a skillet over medium heat, cook your ground beef (or preferred protein) until browned.
- Drain Excess Fat – This helps prevent the filling from becoming greasy.
- Season It Well – Stir in taco seasoning and a splash of water to evenly coat the meat. Let it simmer for a couple of minutes to absorb all the flavors.
- Let It Cool Slightly – This step is crucial because adding hot filling to the tortillas can make them soggy.
Step 2: Assemble the Taco Sticks
This is where your taco sticks start taking shape!
- Lay Out the Tortillas – Use soft flour tortillas for easy rolling.
- Add Cheese First – Sprinkle shredded cheddar, Monterey Jack, or a Mexican cheese blend along the center of each tortilla.
- Spoon the Taco Meat Over the Cheese – Distribute evenly to ensure each bite is packed with flavor.
- Roll Them Tightly – Fold in the edges slightly, then roll them up like a burrito to keep everything sealed inside.
Step 3: Cooking to Crispy Perfection
You have a few options when it comes to cooking Cheesy Taco Sticks, depending on your preference for crispiness and convenience.
Oven-Baked Method (Healthier & Less Messy)
- Preheat your oven to 375°F (190°C).
- Place the rolled taco sticks seam-side down on a lined baking sheet.
- Brush lightly with melted butter or olive oil for a golden, crispy texture.
- Bake for 12-15 minutes, or until the tortillas turn golden brown and the cheese is fully melted.
🍳 Pan-Fried Method (Extra Crispy & Golden)
- Heat a skillet over medium heat and add a little oil.
- Place the taco sticks seam-side down and cook for about 2-3 minutes per side, until crispy and golden brown.
- Transfer to a paper towel to drain excess oil before serving.
💨 Air Fryer Method (Quick & Crispy)
- Preheat your air fryer to 375°F (190°C).
- Place the taco sticks in a single layer, ensuring they don’t overlap.
- Air fry for 6-8 minutes, flipping halfway for even crispiness.
Step 4: Serve & Enjoy!
Once they’re golden and crispy, it’s time to dig in! Pair your Cheesy Taco Sticks with your favorite dips:
✅ Salsa – Classic and fresh!
✅ Guacamole – Creamy, rich, and perfect for dipping.
✅ Sour Cream – A cool contrast to the warm, cheesy filling.
✅ Queso Dip – Because you can never have too much cheese!
Pro Tips for the Best Results
- Don’t Overfill the Tortillas – Too much filling can make them difficult to roll and seal.
- Use Freshly Grated Cheese – It melts better than pre-shredded cheese.
- Seal with a Bit of Water – Lightly dampen the edge of the tortilla before rolling to help it stay closed.
Now that you’ve mastered the process, it’s time to get creative! In the next section, we’ll explore some fun variations and creative ways to customize your Cheesy Taco Sticks. 🚀:
Fun Variations and Creative Twists on Cheesy Taco Sticks
One of the best things about Cheesy Taco Sticks is their versatility. While the classic version is undeniably delicious, there are countless ways to customize them to suit different tastes, dietary preferences, and occasions. Whether you want to switch up the protein, add extra layers of flavor, or turn them into a kid-friendly meal, here are some creative twists to keep things exciting.
1. Protein Swaps for a Different Flavor Profile
Not a fan of ground beef? No problem! Try these alternatives to give your taco sticks a whole new taste:
- Shredded Chicken – Toss cooked chicken with taco seasoning for a lighter yet flavorful option.
- Ground Turkey – A leaner alternative that still absorbs spices beautifully.
- Chorizo – Adds a bold, smoky, and slightly spicy kick.
- Vegetarian Option – Use black beans, refried beans, or lentils mixed with taco seasoning for a hearty meat-free version.
2. Cheese Lovers’ Paradise: Experiment with Different Cheeses
While cheddar and Monterey Jack are classic choices, why not mix things up?
- Pepper Jack – For a little heat.
- Queso Fresco – A mild, crumbly cheese that pairs well with spicy fillings.
- Mozzarella – Melts beautifully and gives that irresistible cheese pull.
- Smoked Gouda – Adds a unique depth of flavor.
3. Spice It Up! Creative Flavor Enhancements
If you love bold flavors, here are some ways to take your Cheesy Taco Sticks to the next level:
Add Jalapeños – Dice fresh or pickled jalapeños into the filling for an extra kick.
Fresh Herbs – Sprinkle in some chopped cilantro or green onions for added freshness.
Chipotle Sauce – Mix a spoonful into the meat for a smoky, spicy twist.
Avocado Slices – Stuff a small slice into each roll for a creamy surprise.
4. Kid-Friendly and Party-Perfect Twists
Want to make these even more appealing for kids or guests? Try these fun ideas:
- Mini Taco Bites – Cut the tortillas into smaller strips and roll them into bite-sized portions.
- Dipping Bar – Serve them with a variety of dips like queso, guacamole, ranch, and salsa to let everyone customize their bites.
- Breakfast Taco Sticks – Swap out the taco meat for scrambled eggs and breakfast sausage for a morning-friendly version.
- Sweet & Savory Combo – Add a touch of honey or drizzle with a sweet chipotle sauce for a unique flavor balance.
5. Make-Ahead and Freezer-Friendly Options
Did you know you can prepare Cheesy Taco Sticks in advance? Here’s how:
✔ Make-Ahead: Assemble the taco sticks and store them in an airtight container in the fridge for up to 24 hours before baking or frying.
✔ Freezing Method: Freeze the uncooked taco sticks on a baking sheet, then transfer them to a freezer-safe bag. When ready to eat, bake straight from frozen at 375°F (190°C) for about 20 minutes.
✔ Reheating Tips: To keep them crispy, reheat in an air fryer or oven instead of the microwave.
Final Thoughts
With so many ways to customize Cheesy Taco Sticks, you’ll never get bored! Whether you like them spicy, cheesy, meaty, or veggie-packed, these delicious handheld snacks can be tailored to any occasion. Try experimenting with different ingredients and flavors, and make them your own!
What’s your favorite way to enjoy Cheesy Taco Sticks? Let us know in the comments!